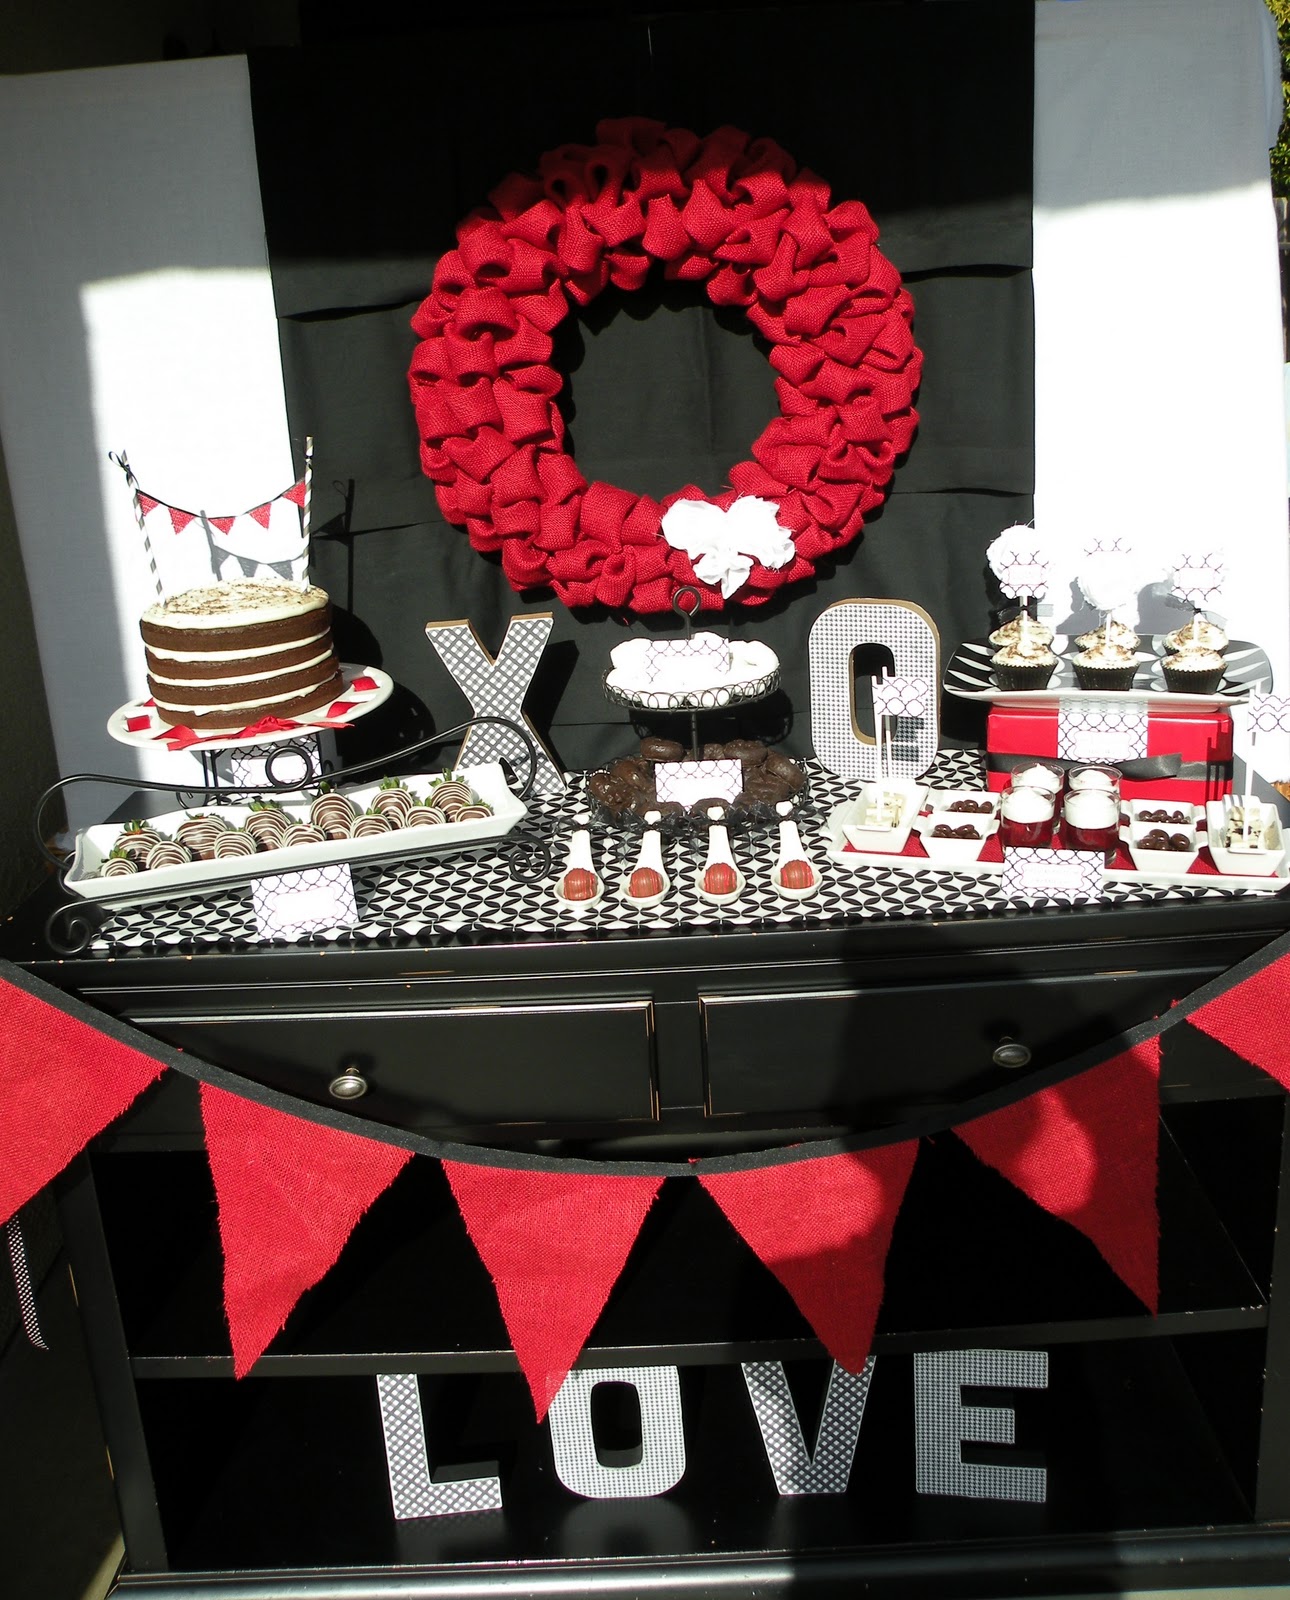
Friday, February 17, 2012

WINNER WINNER CHICKEN DINNER!


CONGRATULATIONS DONNA!!!


COMMENT # 100
YOU WERE THE LUCKY WINNER CHOOSEN BY RANDOM.ORG


Friday, February 10, 2012

Designers Challenge Big Win & 1000 FB Fans Giveaway!

2012 is off to a great start. I am so excited that I was the 2nd Designers Challange Big Winner and I have reached 1000+ Facebook fans! So it is time to CELEBRATE!!! 10 FABULOUS vendors have generously donated some AMAZING prizes valued at over $250 for one lucky winner!!

Here are all of the Fabulous vendors...


Whimsical Printables is offering your choice of any one of her as is packages and you can also choose one invitation personalized to go along with whichever package you decide on!  
Follow on Facebook


Kima'a Konfection's has donated a dozen custom cupcake toppers!
Follow on Facebook


Executive Creations has donated a beautiful custom name art!
Follow on Facebook


Moodylicious Children's Spa and Boutique has donated a Valentines Day Spa Purse that includes lotion, bodywash, face frosting, flower headband, nail polish & file, lipgloss, ringpop and their "Moody Monkey"!
Follow on Facebook

Libby Lane Press has donate a printable invitation and cupcake toppers to the giveaway! (existing designs only) 
Follow on Facebook


Skylar Raine has donated a $20 gift certificate for her beautiful, stylish creations! 
Follow on Facebook


Greyson Designs is giving away a 25.00 gift card to her Fabulous shop! 
Follow on Facebook

The Lucky Elephant has donated a single lucky elephant leather wrap of choice! 
Follow on Facebook


Cupcake Wishes & Birthday Dreams has donated a Pom-Pom Headband and Celebration Tee-shirt -something new She'll be adding to the store!!! 
Follow on Facebook


Palm Beach Parties has donated a $25 gift card to her Fabulous shop!
Follow on Facebook  


So are you ready to enter? Here's what you need to do...


1. Become a blog follower and leave a comment saying you did.

2. Follow each of the FABULOUS vendors on Facebook and leave a separate comment for each one.

Want more chances to win?

3. Pin an item from each vendor on Pinterset and leave a separate comment for each one saying what item you pinned.

4. Share this giveaway on Facebook and leave a comment saying you did.

The giveaway ends on Thursday, February 16th at midnight. The lucky winner will be announced on Friday February 17th!
Good Luck!!!


Monday, January 16, 2012

Love Letters

I am so excited to share my entry for the Sparkling Events and Designs LOVE {Designers Challenge}!


I was so thrilled when I was asked to participate in the 2nd round of the designers challenge! I could hardly contain myself! I was as giddy as a school girl when I told my husband the exciting news. {My sweet husband always replies with... that's great honey!...because he really has no idea what I'm talking about. lol}

The rules  for the challenge were....It had to be a Valentines Day-LOVE theme, have some treats, a favor and a craft all for only a $100 budget! So I had to be creative and crafty!

I LOVE burlap and I am all about making craft projects so I bought 3 1/2 yards of red burlap {with my 40% off coupon} and went to town. I made the wreath, flower ball, pom poms, napkin rings and chair bows all with $8 worth of fabric!

I knew right away that my color scheme was going to be Black, White and Red because I had been dying to style a table with my FAB-U-LOUS plates that my mom and I found at a BIA warehouse sale.


I got 4 appetizer plates for $3.99 and a matching platter for only $2.99!!!! The diner plates were from Home Goods and they were only $3.99 each. So my beautiful place settings were only $5 a piece! {You know you thought they were super expensive. :)}

I love celebrating valentine's day with my kids and my hubby, but I thought it would be fun to take a slightly different approach and have a party for my mommy friends.
I got this wild idea that I wanted to give each one a special Love Letter from each of their kids as their favor, so with a little help from a babysitter and a couple of teachers, I got three reasons "why I love my mommy" from each child. I printed them out and I wanted to frame them in these beautiful frames I had seen on the Internet but their price tag wasn't in he budget. I was just going to have to get creative.

I headed out to my garage to see what I could come up with. Now those who know me, know that my garage is like Mary Poppins magic bag. It is a never ending supply of craft and party goods. I found a can of black spray paint and a stack of the $1 wood frames from Michael's {I'm sure I had a really great idea that I needed them for at one time}. I had seen this really cool DIY on Pinterest on how to emboss wood so my hubby ran to the hardware store and picked up some wall fix for me and I created these great frames.

I love how they turned out! I placed one at each place setting and they looked absolutely beautiful on the table! I set the table with a white table cloth, two black table runners {made from a failed attempt at faux Roman shades for my kitchen}, black napkins with a DIY napkin ring made from a cling wrap tube and a vase with a DIY burlap flower ball.


I really wanted black chairs, but my hubby was not going for it, so I tied strips of burlap and ribbon around my chairs and it gave them a whole new life. I love how simple they are but they add so much to the table. And of course who doesn't love hanging pom poms to complete the look. :) 


I had recently been to a vinyl party and everyone was swooning over the signs so I thought it would be fun to make a vinyl sign for my activity. My hubby cut some left over fence boards for me and I gave them a light coat of white spray paint. I pre-cut all the vinyl, ribbon and the names of their kiddos. Each guest had the freedom to lay their sign out the way they wanted.


I even DIYed the desserts! I made the cake, hand dipped the strawberries, and made mini cherry pie shooters.


I used the O from the HO HO HO at my Christmas part so all I had to buy was the X. The banner was from my fall decorations but it had a brown ribbon so I just flipped it over and hot glued a black ribbon on the back and now it's reversible!


I made a mini bunting for the cake with the left over burlap scraps and hung it from some paper straws left from my kids' birthday party.


I made the flower toppers from some muslin fabric scraps I had in my fabric box.


The black and white paper mache letters spelling "love" were from my sister's bridal shower. The backdrop was made from a piece of white muslin from my nephew's pirate party, my {failed} faux roman shade and the burlap bubble wreath I made myself!! Finally, I created my printables with standard love letter closures- love, xoxo and always and forever. {I tell my boys every night I love them always and forever.}
 

I was so happy with the way my design turned out. It was affordable, personal and beautiful!

Here is the budget breakdown:


Decor, Favors and Activity:
Fabric - $8
Wreath Supplies - $7
Favors - $7
Craft - $6
Paper Mache X - $2
Total = $30

Desserts:Food - $35
Treat Sticks - $3
Total = $38

Serving Pieces:Appetizer Sample Platter - $24
Appetizer Spoons - $4
Total = $28

Overall Party Total = $96


With a little creativity and a few DIY projects, you can have a beautiful party at any budget.

{Stay tuned for a series of DIY posts for all of the fabulous projects I made!}

Thursday, December 29, 2011

The "Pinterest"ing Things I Did In 2011

I thought it would be fun to take a look back at the ideas I pinned and see how many of them I actually used. I was surprised to realize that I actually  used more ideas than I thought I did. I posted the pictures of most of them and the link from Pinterest and in some cases a picture of how mine turned out.  :) 
I made this for my family for our Christmas gathering. It was BIG HIT!!!
{I didn't take a picture of mine but I assure it looked just as beautiful! lol}

I totally forgot to take pictures of my gifts, but I used red and white polka dot paper for my bows and white gift bags with red and green tissue paper and red/green glitter monograms hanging from them. They were super cute and it made it really easy for handing out gifts!

I love this whole wall, but our boys have a space under their windows so that's where we are going to hang them. Yes, I said going to hang them it's still on the to do list. :)

This worked great!
{I didn't get a picture of mine.}

I LOVE how pretty these look and to think I had mine in a zip lock bag!
Can you imagine?!

{I got a little over excited and started putting everything in mason jars! lol}

I loved the idea of adding a little pizazz to a plain frame and...

I happened to have 4 of them sitting in my garage.
I love the way they turned out!

What a fun way to display your donuts.

They looked so pretty on my table!

This was such a great idea! This free download was super cute
but of course I couldn't find the link when I needed it so...


I had to recreate it from memory.
I already have the cute one downloaded for next year. :)

 
I LOVE this but I can't show you mine yet because I couldn't
 find enough berries to finish it! lol


This is so pretty!
I thought it would be perfect as a backdrop for...

a winter party.
{My photography isn't so great but it really was pretty in person.}

 I used this as an inspiration for...

these. :)  The original design is really pretty
but this matched something else I already had.

I thought this sounded like something different to try this year
for our staff Christmas party.

We made two bowls of the candy cane punch and it was a BIG HIT!!

 
ORDERED IT!! Can't wait to get it! :)

I made the snowman sandwich faces for my little boys.
They loved it!!

I loved the burlap wrapped around the table,
but I thought it would also look great as..


a backdrop!
I love the simple elegance of it.

I also got this idea to wrap mini loafs in coffee filters and tie with ribbon
but I couldn't find my pin to show you the original.
I thought these little cuties looked so adorable sitting on that trunk that..


I had pictures done by Simply Sweet Photography with my boys and a trunk!
{Clearly my youngest loved the idea too!!! lol}

I totally say this to my kids all the time now!!! lol

Finally, I had to add a link to my whole style board because I actually get up every morning and pull up my style board on my phone to look to see what I can I try to pull together!
{I know, I'm such a dork! lol}

I had so much fun getting inspiration from Pinterest in 2011. I can't wait to see what great ideas I will find in 2012!