With the theme picked, I started planning. I was inspired by a contest where designers were given a $100 budget to create their parties {and the lack of funds in my bank account} and decided I was going to try to do it too.
So I pulled my resources and here is how it turned out!
A moss covered wreath with a burlap ribbon greeted guests as they arrived.
At Hiccup's workshop I hung shields on the fence for the kids to grab and decorate.
I used the 14" cake circles from my local craft store and cut out glitter circles for the center.
Then I went to the Dollar Store and loaded up on glitter glue and various foam stickers decorating!
The kiddos decorating their shields.
Grammy bought the boys dragon Happy Nappers that double as decor!
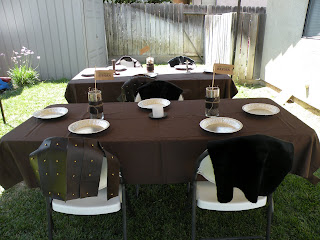
I went with a primitive viking tablescape.
Each place setting had a pie tin for a plate
and a faux leather "Astrid" skirt or a fur "Hiccup" cape.
I used candles and vases with rocks, moss and a birthday flag.
Modeling their new viking duds.
I converted my lemonade stand into a forest setting.
I used my Christmas trees, rocks from the backyard
and old shoe boxes covered with moss to create my forest.
The treats included dragon cake pops, magic bars
cupcakes, apples, berry candies, cherry fish and trail mix.
The "Toothless" cake pops
and dragon cookies were the hands down favorites!!!
My birthday boys Hayden{top} & Ethan enjoying some birthday treats!

I just LOVE paper straws and flags!!
No dragon party would be complete without a dragon pond.
My little birthday boy Riley having a blast with is partner in crime Abby!
Now are you ready for the grand total?
I spent $91!!!
Here is the break down:
The Banner, Drink Flags, Signs, Posters and Centerpiece Flags-
I used a roll of shipping paper from the dollar store to make all of them for only $1!!!
The Shields-
I used 12 14" cake circles. I already had 6 from a previous project so I bought one package for $6 and the glitter and foam stickers came from the dollar store for a total of $5. I used a couple of scraps of glitter paper to make the center circles.
The Skirts and Capes-
The fur capes didn't cost me a penny! My mother-in-law had a couple of yards of fur in her stash from a project she never got around to so she gave it to me! For the faux leather skirts a bought a yard of brown vinyl for $6. I used two gold bead necklaces that were leftover party favors and cut the beads apart to use on the skirts.
The Wreath-
I purchased a straw wreath for $3 and a package of moss also from the dollar store for, you guessed it, $1. I used a scrap of burlap to complete the project.
Plates-
The disposable pie tins I used came in 3 packs. I bought 4 pack for $14.
Cupcake Liners & Paper Straws-
These items came from The Cupcake Social for a total of $11.
Dragon Pops-
My AMAZING "toothless" cake pops were made by my dear friends Susan and Jennifer for only $24!
Dragon Cookies-
I have to confess I am using a bit of a technicality on this one. My INCREDIBLE cookies came from Lori's Place. I had some money already in my pay pal account so my out of pocket expense was only $20.
I loved the challenge of trying to think of ways to use items that I already had and calling on friends and family for helping out. I absolutely LOVE the way this party turned out and most importantly my little guys had a great time celebrating their birthdays with their friends and family. :)


LoVe it! So excited that you were inspired by the $100 Designer's Challenge! {I'll have to step up my game!}
ReplyDeleteLove that you were inspired by our challenge! It turned out great... I'll share with our friends!
ReplyDeleteEbony
Sparkling Events & Designs
Fabulously done! What a charming party--and worth way more than the meager amount you spent!
ReplyDeleteThat is great! I know your boys and their friends had a ball!
ReplyDeleteStefani, I love your party and how you did it on a budget!! Everything was so cute and the kids looked like they had a lot of fun. I love your idea of the shield and having the kids decorate them. My little one loves How to Train Your Dragon as well, his B-Day isn't until December. I have the invitation designed already but had no idea what I was going to do for the party. If it's okay with you I would love to borrow some of your ideas. ;)~Lisa
ReplyDeleteLove that you did this fabulous party for under $100!
ReplyDeleteYou are amazingly creative & resourceful! And what a fun party concept--the kids obviously loved it!
ReplyDeleteThis is amazing! Great job. That is my daughter's favorite movie and I was wondering how would I ever do something for it. Thanks for sharing!
ReplyDeleteWow! Amazing and soo creative. I've got two girls with January birthdays so outdoor parties are a no go and our house can barely hold 2-3 kids with their parents.. My girls BOTH love that movie....
ReplyDeleteWhat font did you use?
ReplyDeleteI'd also love to know the font you used... and I'm guessing you cut the shipping paper into letter-size sheets to print on??? What a great party!
ReplyDeleteLove this!! Great job! Where and how did you print on the packaging paper?
ReplyDelete